Ten Pounds of Frozen Mulberries

I have ten pounds of frozen mulberries. 20150707_143950

At the end of the season I moved from my calm handpicking method to much more drastic measures involving a tarp, some bungees, and a long PVC pipe. Yields went up. Tree limbs went down.

By now the tree has finally mellowed and stopped producing fruit. The birds have moved to greener pastures and the driveway no longer smells like vinegar. And I have to find something to do with all this fruit.

Or rather, I have to find a few things to do with this fruit in a way that adds up more or less to ten pounds. Thankfully all the berries are frozen, so any time constraints are replaced by freezer space constraints. Which are also kind of pressing.

For my first project I’m trying a very simple wine. I’ve read a few recipes that recommend adding raisins or juice because mulberries on their own make for a very thin-bodied wine. In fact, the alternate recipe in that link calls for both raisins and orange juice. For my first batch, though, I’d like to do without the bells and whistles. I’ve still got six pounds to tinker with if I think I can make improvements. And I figure as long as I’m in this house I’ll have summertime mulberry re-ups.20150721_220801_HDR

I thawed four pounds of berries and threw them into a bucket. They were still unbelievably cold, so instead of crushing them with my hands like in the old country, I used a potato masher. I think the effect was more or less the same.

I added a pile of sugar plus yeast nutrient, acid blend, and pectic enzymes. I threw in some sodium metabisulfite and let the berries sit for a day to hopefully kill off whatever’s been living in our driveway.

Then I pitched the yeast and got this bizarre moonscape. I’d say it’s halfway between a satellite map and a cobbler.20150723_162514

I let the yeast do its thing, squishing the berries and swirling the bucket daily, leaving the lid loosely on the bucket with just a cloth over the grommeted hole to let oxygen in but keep fruit flies out. I did this for a week, and I think it was too long.

A lot of my problems at the moment seem to come from the weather being too hot. I can’t wait until a few months from now when I get a whole new batch of unforeseen cold weather problems. 20150730_124032_HDR

I racked the wine to a carboy by siphoning it through my trusty mesh funnel. I forewent my old nylon stocking trick because I thought the wines I’d used it on had a certain… nylony taste to them. The funnel worked just fine, and I got a beautiful full carboy of mulberry wine…

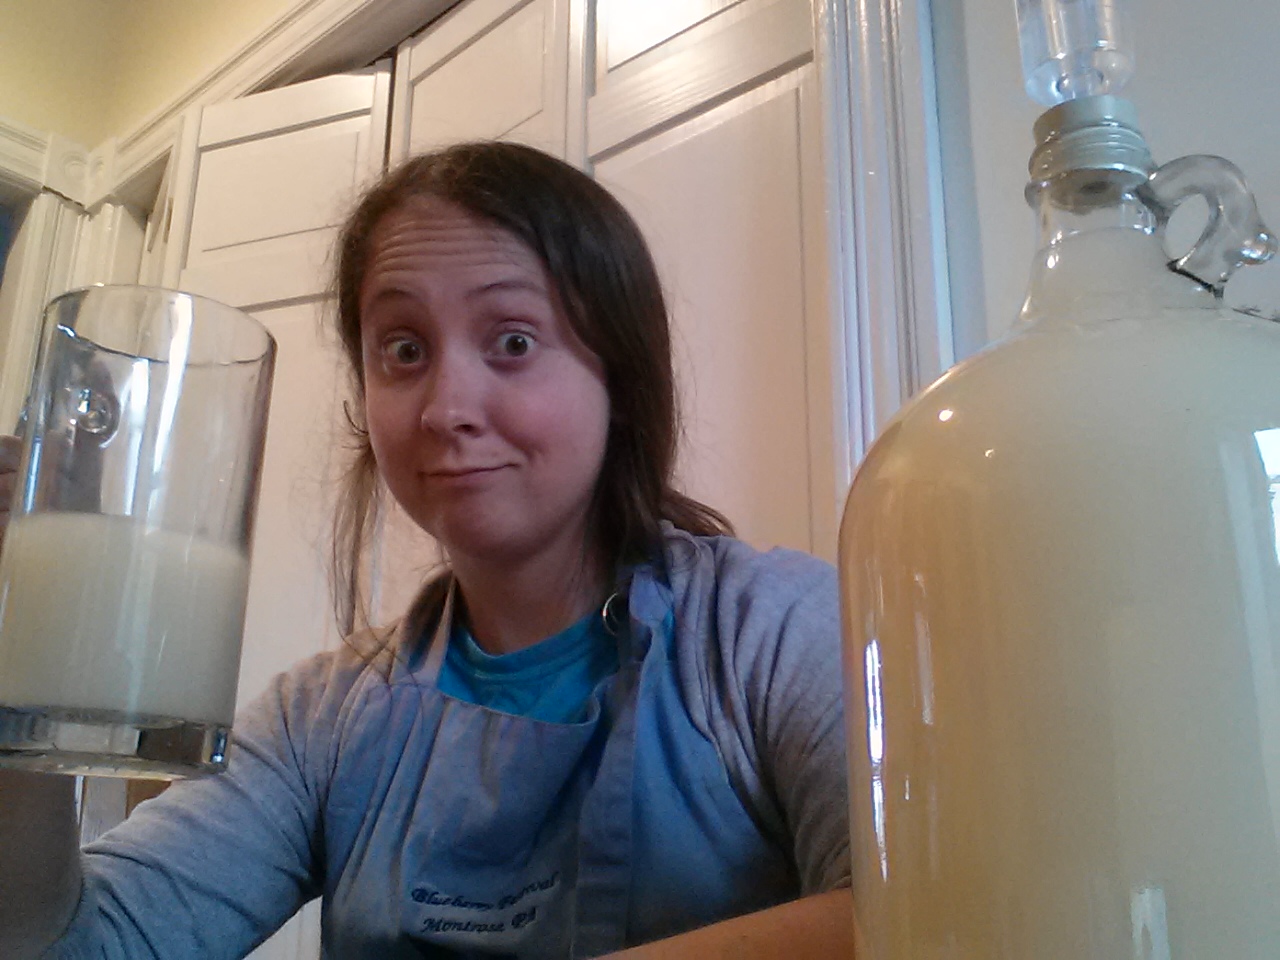
…That isn’t showing the slightest signs of fermenting.20150730_125359_HDR

It’s a great color. It tasted… fair. But there’s not a single bubble in the airlock. There’s not a single bubble creeping up the inside of the glass.

This stuff just isn’t fermenting anymore.

I’ve been reading up, and the problem is almost certainly due to the heat, of which we’ve had a lot lately. There’s a chance the fermentation has gotten stuck due to big fluctuations in temperature, which we’ve certainly had between daytime and nighttime. There’s also a chance it’s been so hot during the day that the fermentation has gone into overdrive and just plain finished.

I’m hoping it’s the latter problem, and I’m going to proceed as if it is and see what happens. I gave the carboy a hearty shake and no yeast turned up. I tasted it and it certainly tastes fermented. There is a risk that if it fermented at a very high temperature it’ll produce off flavors. I’m not sure I’m up to a high enough standard for that to be a problem yet.

20150803_175512_HDRWe’ll have to wait and see with the plum wine I’ve just made, too, because the exact same thing happened to it. Nice fermentation in the bucket, none at all in the carboy. Beautiful color and wine-y but not by any means good taste. Whatever the problem is, it seems to be environmental, and I’m tempted to believe it was a rapid fermentation.

This is partly because it means I don’t have to worry about it anymore.

Honey on Tap

Two bee posts in a row? But how? 20150801_113442

Truth be told, my last post was about events of a few weeks ago. Today’s is about today. So, through blog magic, you get to see the results of nearly a month of honey box action!

Before going in, we always thoroughly smoke the bees. Using this great little steampunk contraption we slowly burn pine needles, pumping the bellows occasionally to create nice puffs of white smoke. Once you’ve let the needles burn for a few minutes, the smoke changes from hot to just warm and, for bees, intoxicating. It has a real calming effect on them that beekeepers have known about and exploited for centuries. And it really does seem to work. 20150801_112412

After giving the bees a few minutes to get drowsy, we prised open the hive. We set the honey box aside for a moment and examined the top box in the hive body. This is where the queen ought to be laying and new bees growing up big and strong. These frames were covered in honey that had dripped down from the honey box. A very good sign.

We took a peek inside the top hive body: no sign of the queen this time either, but there was a huge amount of brood (egg cells), as well as larvae and some honey and nectar. Basically all evidence of a healthy and productive colony. 20150801_114135 (1)

After that it was into the honey box.

We could tell just from lifting it that the bees had been at work. Honey ain’t light.

The honey box is working exactly as we were hoping it would. Of the ten frames, two and a half are completely filled with honey and capped, meaning the bees have declared it done and sealed it off for storage. All the rest of the frames have at least some honey in them. This couldn’t be going better.

The bees are working at a very fast rate, which means we have to take our next few steps fairly quickly. For one, we’ll want to add another honey box so they have plenty of room to expand and won’t slow down production or move honey storage back down to the hive body. For two, we’ll begin our honey extraction. We have a special excluder screen that fits under the honey box and allows bees out but not back in, because honey collection is easier when thousands of bees aren’t involved. 20150801_114623 (1)

Or so I’ve heard.

I’ve cross-posted this one with the community garden’s blog, too. Go give it a read!

The Road to Honey

The bees are living the good life. 20150706_122814

At least they seem to be. It’s high summer and they’re producing well, which means it’s time to start messing with them. On our most recent trip in, the plan of action was to take stock of life in the hive and, if all was well, install a honey box.

A honey box is a slightly squatter version of the boxes the bees live in. The main difference is that it’s separated from the rest of the hive by a queen excluder, a sheet of metal mesh that the worker bees can fit through but the larger queen bee can’t. That means no eggs can be laid past it, and it can be devoted to honey. Not all beekeepers do this, but it seems a whole lot easier to me. Here’s ours: the excluder will obviously go under it when we place it on top of the hive.

Our first order of business was to pretty up one of our old honey boxes. This meant scraping away all the propolis. Propolis is a hard, waxy substance (not to be confused with wax) that bees make to cement their hive together.

20150706_122104My friend Tommy, of previous mulberry
fame
, was visiting, so we set him to work scraping propolis off of the honey box and frames.

Poor guy. It was his birthday.

We went to the zoo afterward, though, so it was alright.

Propolis is popular as a dietary supplement and all-around healer. We saved all of our scrapings in an envelope that I put… somewhere. As soon as I find it I’ll try concocting a balm.

Once the honey box was prepped, we donned our suits. Kim always wears a full suit, and we managed to get Tommy fully outfitted. I always wear a full coat, veil, and gloves, but the rest of my outfit is a little more improvised.

20150706_123400I had already tucked my jeans into my socks when we discovered some holes worn through in a particularly bee-vulnerable area. I didn’t want to go all the way home for new pants, and I certainly didn’t want inner thigh stings. We had a roll of masking tape in with the equipment, and when needs must…

I wasn’t doing much with my dignity, anyway.

All passages to tender flesh sealed, we opened up the hive and took a look around. The bees have been producing famously. The queen is laying eggs at a good rate and the workers have started making honey. A couple of the frames were already noticeably heavy with it. With any luck they’ll take this new honey box and run with it.

20150706_125621The last few times we’ve been able to find the queen, but this time she was hiding. This isn’t particularly worrying – there are thousands of little guys crawling around in there, and you can’t let yourself get down just because you didn’t find a specific one. It’s mainly good to find her because it shows she’s active, but with all the eggs and larvae present, it’s easy to intuit.

We also know she’s doing well because we haven’t found any queen cells. These are big, peanut-shaped protrusions on the frame, and each one holds a larva that’s being fed royal jelly – the goop that gives a queen that special queen flair (and ability to lay a whole hive’s worth of eggs). One of these larva will emerge before the others and, as her first royal act, she will murder all her proto-queen sisters in the womb. Bees are rough. This can happen when the previous queen is dead or just not very good at her job, so a lack of queen cells is a nice vote of confidence from the colony as a whole.

Queen cells may also be laid in preparation for a swarm. Bees swarm when they’ve20150706_125640 filled up their hive – the existing queen leaves, taking roughly half the population with her to seek greener pastures. The remaining colony stays behind with a freshly hatched queen. Our plan, if this does happen, is to steal the new queen before the swarm and raise her up separately in her own little queen nook. This way we’ll have an extra queen in our pocket if ours suddenly dies or a neighboring beekeeper loses theirs and calls in a favor.

It’s also another interesting way to play God.

I’m cross-posting this bee update on my community garden’s blog. Go check it out!

The Worst Cakes in Providence

I didn’t even plant fennel. 20150618_125335_HDR
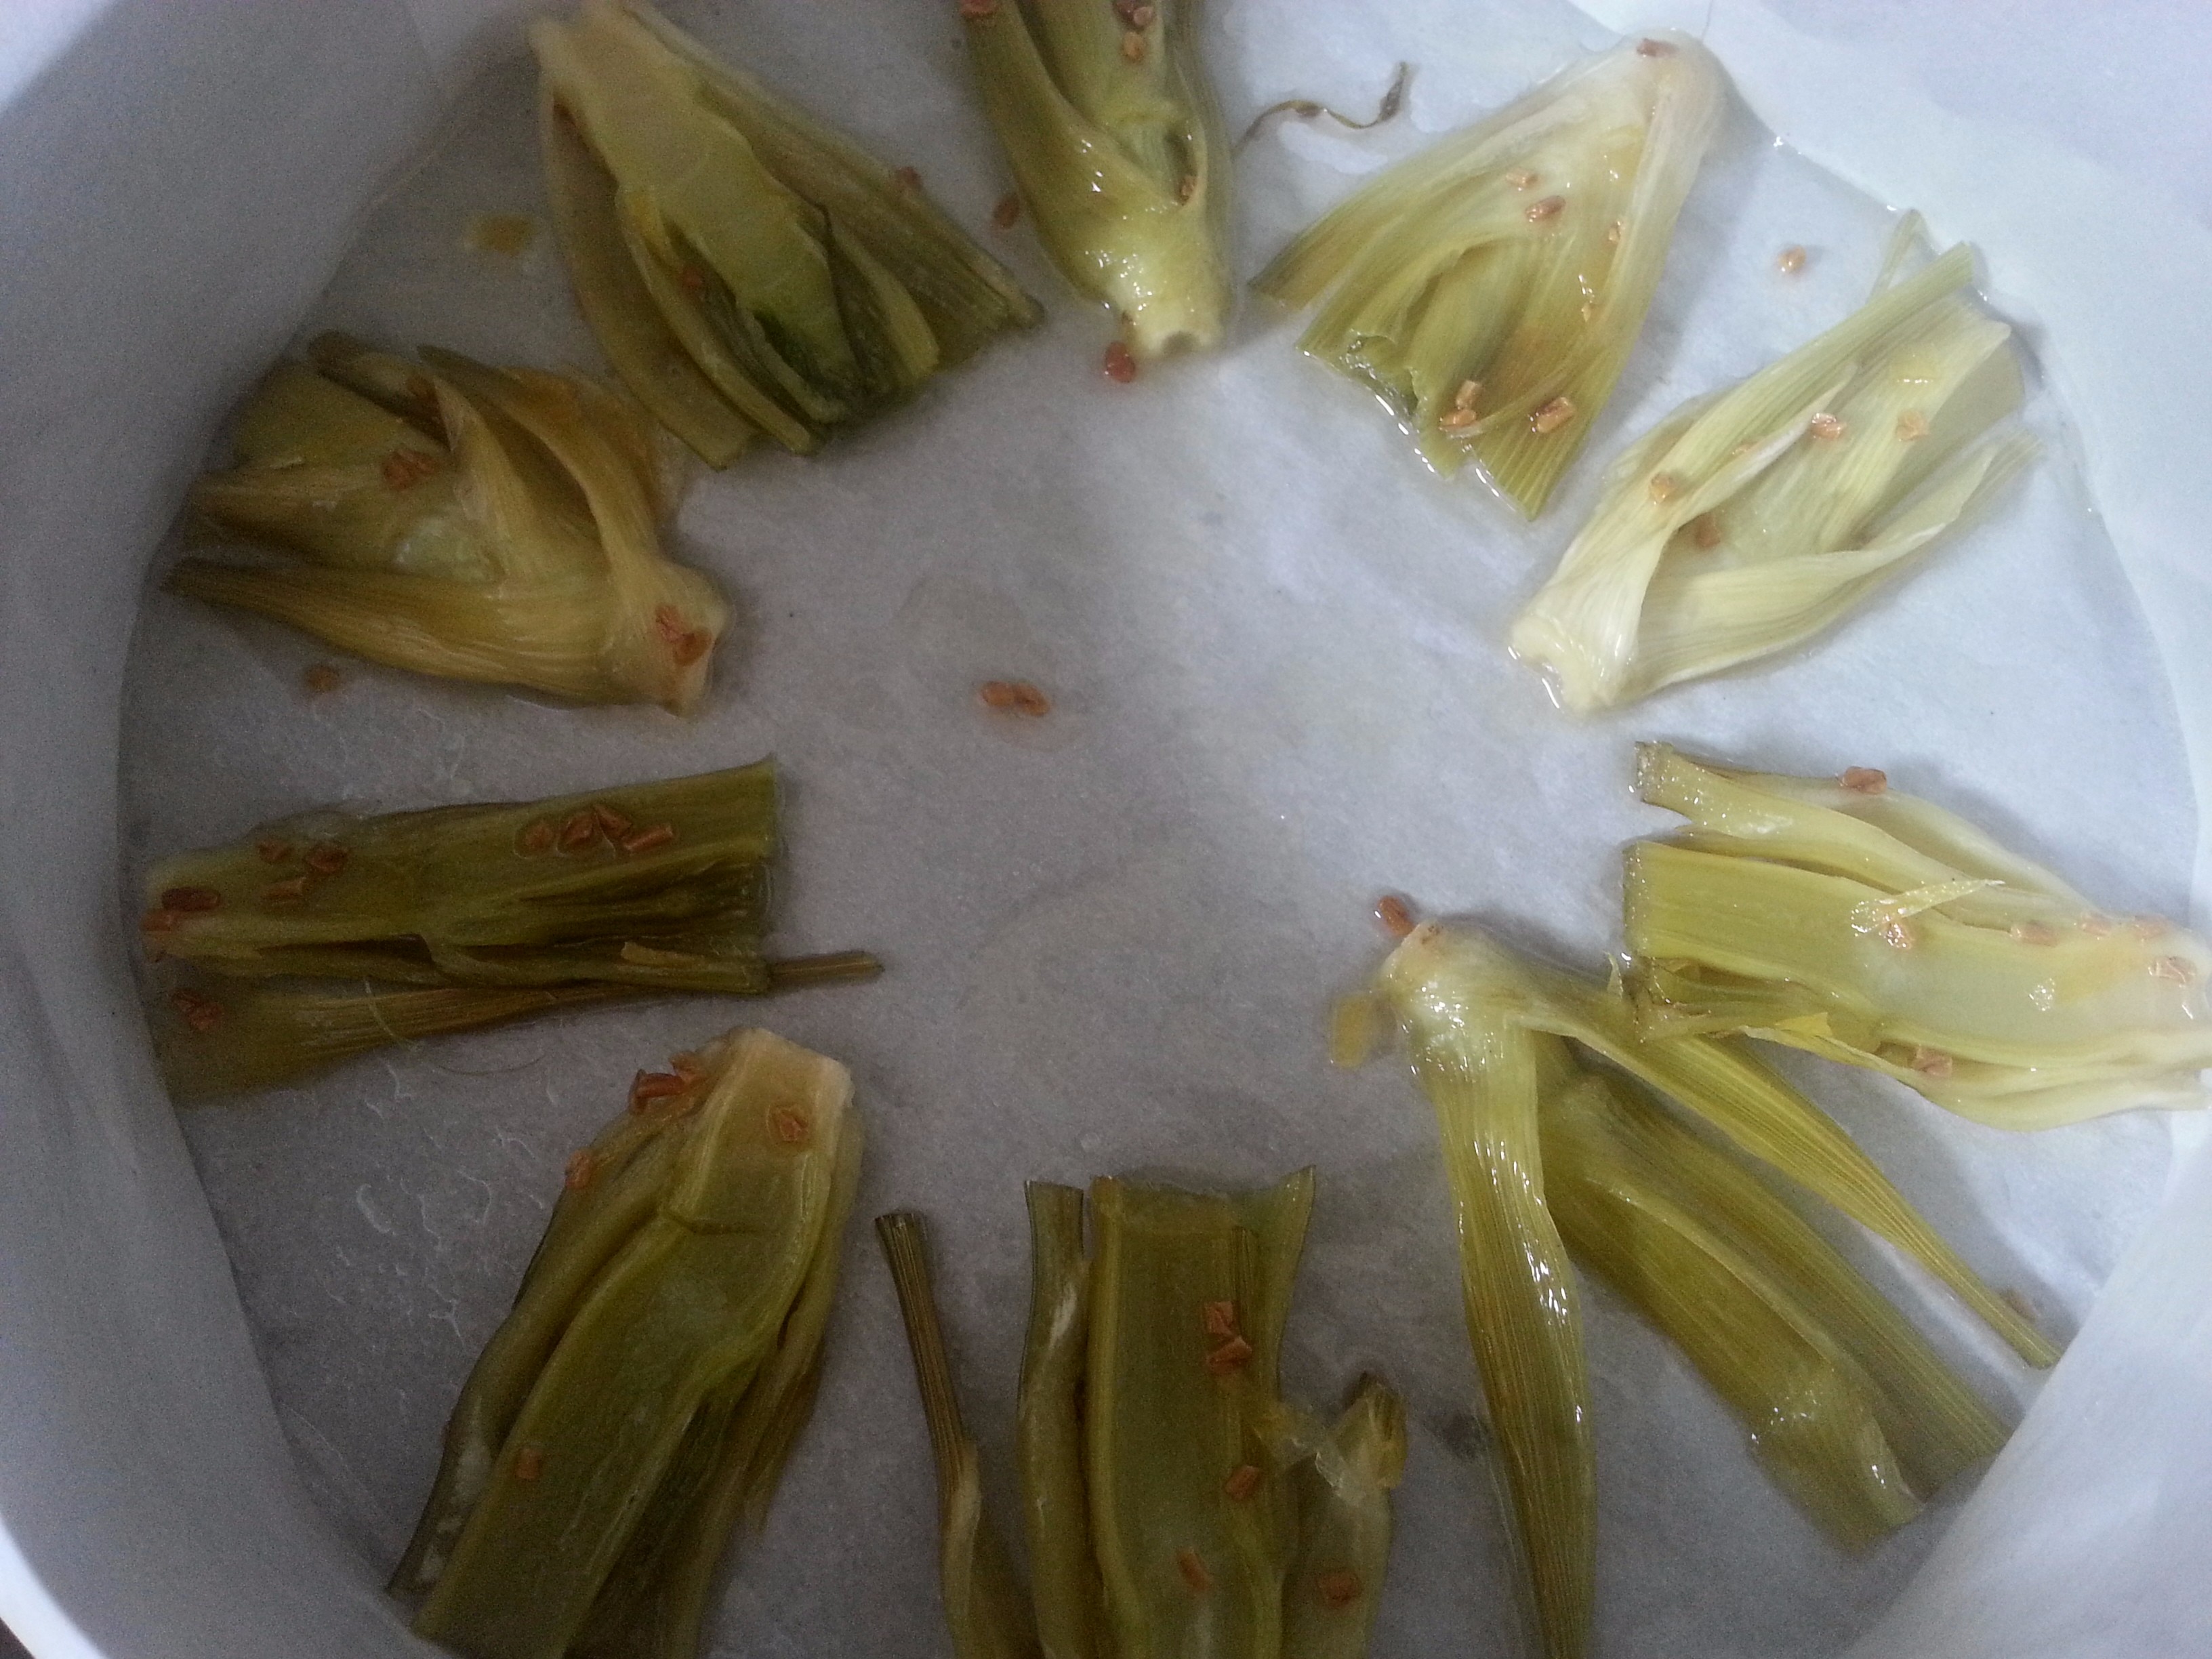
My neighbor in the community garden grew fennel last year, and it went forth and multiplied. Which is how I wound up with seven hardy volunteers in my plot this year. I would have pulled them, but they looked so happy and healthy (happier and healthier than a lot of my own vegetables) that I kept them. Besides – why turn down free fennel?

Unfortunately, as time went by, the fennel got so happy and healthy that it was shading everybody else. I wanted to get rid of it, but didn’t have the heart to do it before the bulbs formed. Finally, nature took pity and made the decision for me. An especially hot week made all the fennels begin to bolt at once. I’d read that the bulbs of bolted fennel are terrible, so I went down one night and gleefully ripped them all out of the ground. I left one, which I thought I might harvest for seed.

The next day was a lazy Saturday – dark and raining intermittently, it wasn’t a good day to set out far from the house. It was a good day for cooking, and I was suddenly fennel rich. I scoured the internet for something unusual I could do with fennel, preferably a dessert. I found exactly what I was looking for in this Candied-Fennel-Topped Lemon Cake. I wouldn’t even have to go to the store.20150718_141207_HDR

This cake was fascinating to make. I brought the fennel bulbs to a boil on their own, then drained them and simmered them with sugar, lemon zest, and fennel seeds. This step smelled amazing, and allowed me to indulge an age-old fantasy that I’m a 14th century monk who tends the abbey gardens and cooks up balms and cordials. Anyway.

In the meantime I mixed up a simple buttermilk cake batter with lots of lemon zest. The one resounding complaint in the recipe’s reviews was that this lemon cake barely even tasted like lemon, so I scraped clean all one and a half lemons I found in the fridge and came up with about double what the recipe called for. I’ve always been a proponent of extra lemon. 20150718_145921_HDR

I lined a round pan with parchment paper and oiled the heck out of it so my sugary fennels wouldn’t glue themselves down. My pan was wider than the recipe’s so I got this courtyard in the middle. The recipe also said the pan could be filled with a single fennel bulb, cut lengthwise into 1/4 inch slices. Mine took five. And “bulbs” might be a bit of an overstatement. I filled my pan with five bottom parts of fennel plants, cut into 1/4 inch halves. Then I reduced the syrup I’d simmered them in and poured it over.

I added the batter on top of that, then baked it for half an hour, which turned out to be the perfect amount of time for this pan. It smelled… mostly good while baking. Definitely interesting. It did smell like there was a competition between the generic sweetness of the cake and the herbiness of the fennel. The smells didn’t exactly mesh.20150718_153652

The cake came out of the pan with no incident and looked… pretty weird. Like someone had thrown a bunch of vegetables on top of a perfectly good cake. Which they had. And one of the fennels drifted away, ruining my thrown vegetable symmetry. Oh well. The taste made up for it, right?

The taste did not make up for it.

This was one of the worst things I’ve eaten. The sponge was fine, and I’d say double lemon was the right amount of lemon. But the fennel seeds snuck up on me. I thought they would have softened, but they were still hard, and with every other bite I’d hit one or two. They were tasteless until bitten down on, whereupon they’d release a flavor I wouldn’t even classify as “fennel.” I’d just call it “bad.” The fennel itself, despite all that simmering, was still just a vegetable, and so tough. I had to eat this cake with a knife and fork, and even in manageable pieces the fennel was sometimes unchewable. Granted, I might have chewed longer, but I wanted it to be in my mouth for as little time as possible.

I am not a picky eater. I like eating almost everything, and I will try absolutely anything. But I’ve never liked anise. I thought that baked, with lots of lemon and sugar, it would be different. I thought I could gain an appreciation for it. I was wrong.20150722_122124_HDR

I’ve dared roommates and visitors to try it, and they haven’t given it nearly such a bad review. They’ve called the fennel “a little chewy but good.” It’s still with us four days later, but it’s almost half gone, so somebody’s been eating it. Maybe it’s not as objectively bad as I thought, but if you don’t like anise, it is subjectively horrible.

I ripped out that last plant in my garden. I don’t think I need to save any seeds.

Wine Successes and Unsuccesses

IMG_20150714_212055272The wines are resurfacing! For the past month or so, they’ve been bubbling and settling away in the cellar. Every now and I again I check on them to make sure they haven’t exploded and created an ant paradise. Since I went through such a wine frenzy, everything was brewed at roughly the same time. Meaning everything has to go through its next step at roughly the same time. Meaning now!

I dragged everything upstairs and we had a Grand Tasting. Most of the wines just needed to be racked, but how can you not taste a little bit? These are our findings.

Rhubarb Wine: Still looks like dishwater, but not unpleasant. I have hope for this one. I racked away a lot of lees, so I can imagine it clearing up some day. The taste is basically unchanged.

IMG_20150714_211444152IMG_20150714_211446317Grapefruit Wine: Close to undrinkable. To be honest, the main problem with the grapefruit wine is that it tastes so much like a grapefruit. I’m not sure what I expected in that regard. I’ve been picturing something light and crisp and sweet, more with the fragrance of grapefruit than anything. And that still may be achievable, with a lot of ageing and a lot of back sweetening. This wine has such an edge to it, I can’t imagine it would be any fun to drink dry.

Blueberry Wine: A strong contender. This was one of the house favorites. It’s got a very distinct blueberry flavor that borders on being too tanniny. There was a huge amount of sediment in this one, and I had to make up for the missing volume with water. It’s so dark and strong, though, even with the added water, that I think it’ll be alright. For the future, though, I need to invest in some glass marbles for bringing up volume.

IMG_20150714_211500365IMG_20150714_211458292Elderberry Wine: Basically vinegar. I don’t know where I went wrong with this one. I had such high hopes for it when I racked it the first time. It was dark and raisiny, by far the closest thing to grape wine I’ve made so far. But something has obviously changed between then and now, most likely one of those stray foreign yeasts I’m always sanitizing against. Everything I’ve read has said that if you do one thing right, it should be sanitizing. I try to sanitize faithfully, but I do have a cat and roommates and a kitchen that’s far from spotless. At my level a bad wine now and again may just be par for the course. The recipe I’m following does say that this wine improves with age, so I’ve racked it and put it back in the cellar in the hopes that the long road to improvement includes an early vinegary phase.

Mead: Genuinely good. I started the mead and the strawberry wine earlier than than all rest and had racked them both once already. According to my recipes, this meant that I could bottle them or let them age, depending on my tastes. Mead apparently gains a lot more complexity if you age it, and some people whose blogs I’ve read wouldn’t dream of drinking mead that’s under a year old. I’m new to this, though, and impatient. And the mead was really very good. So I decided to bottle it! I can always make another batch and age it for longer to do a comparison.

My only complaint with the mead was that it was very dry. I like sweet wine, and the flavor of honey especially feels disjointed to me when it’s not accompanied by sweetness. Everyone who tried it said they liked it just the way it was, though, so I split the difference. I siphoned the whole carboy off into a bucket and added some Sodium Metabisulfite and Potassium Sorbate to inhibit any remaining yeast. This is absolutely necessary if you’re back sweetening with honey, but I’m paranoid about exploding bottles and figured it couldn’t hurt for my unsweetened batch, too. 20150719_142420_HDR

I filled five bottles with the unsweetened stuff. Maybe I’ll hide one of these bottles from myself in the cellar to see how it ages. To sweeten the rest of the mead, I just added honey, stirred, and tasted until I was satisfied. I’m really happy with the result. It has a strong alcoholic body to it, with a sweet finish. It’s very obviously made of honey. And the alcoholic body is strong. Back in May I was too eager to get started to take any hydrometer readings (something I will be doing from now on), but I wouldn’t be surprised if the alcohol content is at or over 20%. I’ve put it in beer bottles with the idea that they can be shared or portioned out over a day or two like wine bottles. Or drunk by one person after a particularly hard day.

Strawberry Wine: Also good. I’m so happy my bizarre sprouting wine has come out okay. Over the past month it’s settled beautifully and really cleared up. It has an amazing summery smell. According to the recipe, it can be bottled very young, so I took the same tack as with the mead and back sweetened it to taste with honey. Since this batch had been downsized to a half gallon that still produced a lot of sediment, I got only six beer bottles’ worth.20150719_234355_HDR I like the look of a hodgepodge of saved bottles, and I even threw in an old Jarritos bottle to show off the beautiful clear blush. I chose to use beer bottles because this wine, too, is incredibly boozy. I have an open bottle in the fridge right now that I’ve been nursing over several sittings, like a liqueur. My only regret is that I think you can taste the fact that I used grocery store strawberries that had been shipped from who knows where. Sweet as it is, I think there’s a noticeable undertone of that white, foam-like core you get in big, under-ripe strawberries. I’m going to hunt down some farmer’s market berries and attempt another batch, because I think it could be really great.

Thirty-Seven Pounds of Cherries

20150701_140054Apparently when my parents got married, they each already had a manual cherry pitter. So I grew up in a two-cherry-pitter household. One of those.

I went home to visit my parents in Pennsylvania recently. They’re very much into growing and preserving and all those things I’m trying to do, except they’re good at it. Fresh food from the garden was always a given when I was growing up. Although that apple tree has produced one decent crop in my lifetime, and it was the year the fourth Harry Potter book came out.

Summer arrives here quite a few weeks later than in Rhode Island, so there wasn’t much in the way of ripeness yet. I did pick a huge amount of rhubarb to bring back with me, though. My first batch I brought inside to cut apart nicely on a cutting board. Then my mom told me she hacks it up right in the garden, machete style. I did another batch, and it was deeply satisfying. 20150701_134756

When I came downstairs one morning, at an abysmally late hour by my parents’ standards, I was informed that the local orchard had cherries that weekend, and we had to jump on the opportunity before they were all gone! I threw on an old shirt and we took off to beat the rabble.

It was a rainy morning, so the rabble wasn’t out yet, and we went a little overboard, picking 37 pounds of cherries. We’d brought our own buckets, but the orchard owner loaned us a few of her buckets with hooks for hanging from the tree, “to make picking easier.” Ideally, we’d then transfer the cherries to our buckets. But once we’d filled up the loaners, it felt silly not to fill ours as well. It was a flawless grift. I’m onto you, orchard woman.20150629_130916

Of course, on a hot summer day, you have to act quickly before your 37 pounds of cherries squish. Some, obviously, did not survive the ride home. And some had to be saved for general eating. As for the rest, an afternoon-long pitting and freezing operation was established.20150629_155508_HDR

We settled for the first cherry pitter to be uncovered. I believe this one was my mom’s originally.

Cherries have a dishearteningly low pit to meat ratio. One does not simply cut a cherry apart cleanly with a knife. The only way to go about it and not completely lose your mind is to pulverize the whole thing and accept the fact that you’re not going to get every last ounce of fruit and juice. Even by the end of this this method, I could feel my sanity slipping slightly. But in a good way. 20150629_171129_HDR

I mentioned that I’d been considering trying infusing, and my mom fetched a bottle of vodka. For the long haul we filled up this jar with whole cherries. I didn’t get to try it before leaving, sadly. For the moment, though, we mixed up a slurry of vodka and squashed cherries. It was really very good, and made the remaining pitting process a lot more bearable.

A Mulberry Invasion

20150611_101426_HDRIn a way, I’ve been making mulberry wine for two years now. The neighbors don’t have much going on in their yard, but they have one mulberry tree with production rates any orchard owner would be proud of. And it hangs mostly over our driveway. Which means the berries ripen, fall off, and make a vinegary sludge an inch deep.

I know it’ll be a challenge, but this summer I’m hoping to improve upon this setup. Last year my friend Tommy and I got our act together enough to collect one crumble’s worth of fruit, with some heavy 20140713_174232supplementation from other berries scrounged from the community garden and the woods. We called the crumble Fruits of the Forest, and my hat still has stains.

This is a year of proactivity, however, so my plan is to collect the ripe berries daily and freeze them, hopefully accumulating enough to make mulberry wine, which I vaguely remember being drunk at a Redwall feast. If not, it’ll be Fruits of the Forest time again.

As you can see, the invasion has already begun in earnest.20150613_134109_HDR Twice now I’ve gotten out the hose and blasted them into the street, but by the next morning they’re always back in about this thickness. I don’t want to scavenge them off the ground, since they don’t handle the impact well and start to smell vinegary pretty quickly. I’ve had dreams of hanging hammocks to catch them, but with the bird traffic around here I’m afraid I’ll catch just as much poo.

20150612_104734_HDR

I don’t have any pictures of the actual event, but here’s a lively re-enactment.

My roommate’s mother visited recently, and she was having flashbacks to shaking mulberry trees in Iran with a big sheet held out to catch the berries. I adapted this method by laying out a bunch of newspaper and whacking the tree with a broom. It was not a booming success. I took out just as many unripe berries as ripe ones, and when they hit the newspaper most of them bounced or rolled away.

20150612_104628_HDR

In place of that technique, I’m now opting for hand-picking. I find it strangely soothing.

Since our driveway is Birdtown, USA, my initial plan was to pick the berries when they were nearly ripe, then let them sit on the counter for a day or two before freezing them. The birds and I have formed a strange truce, though. They ravage the top branches and leave the ones I can reach, so the berries I’ve been collecting are actually nice and ripe. I’ll have to look into this bond I’ve apparently formed with the natural world and use it to my advantage somehow.20150613_151913_HDR

So far I’ve collected and frozen 5 1/2 pounds of the things, and the tree is showing no signs of stopping.

Man, I hope mulberry wine is good.

An Attempt at Science

This summer I’m using Neptune’s Harvest Fish & Seaweed Fertilizer on everything I grow. It has great Amazon reviews, and it was available at the urban farm supply store where I talked so long with the owner I felt obligated to buy something. I’ve gone whole hog on ideas for much stupider reasons.20150611_094656_HDR

And I have to say, my garden does look a lot more impressive.

20140605_170221

20150611_103512_HDR

On the left we have last year at this time, and on the right we have this year, all fishified.

The fish-drenched guys are definitely further along. The chives are enormous, the greens at the far end are a solid mass, and the peas have completely escaped their trellis. Of course… last year I didn’t plant anything until I got my plot at the end of April. Most of the things in this year’s picture were planted indoors during a February snowstorm. There are more scientifically rigorous studies…

Like this one!

I’ve chosen two vegetables I know grow quickly. I don’t know anything that grows faster than radishes, but I’m worried the hot weather will set them back, so I’m planting beans as well.

20150618_161848_HDRThe Neptune’s bottle suggests soaking seeds before planting in a solution of 1 tsp fertilizer to 1 cup water. Do radish and bean seeds like to be soaked? I’ve never heard they do, but I’m doing it anyway! I’m also doing a control of seeds soaked in regular tap water.20150611_182021_HDR

If you’ve never used fish fertilizer before, trust me when I say it smells just as good as it looks.

I let the seeds soak for 24 hours, then planted them. Another use for Neptune’s, and the one I’ve been using in my garden, is a simple watering with a very diluted solution every one to two weeks. So I sowed a set of each seed that will be watered normally, and a set that will be fished. If you’ve been doing your math, you’ll know that comes out to eight different treatments.

20150612_201151_HDR

And here they are!

All sown at exactly the same time in soil from the same bag in basically the same containers are plain radishes and beans, fish watered radishes and beans, water-soaked radishes and beans, and fish-soaked radishes and beans. I’ve put three seeds evenly spaced in each pot, so hopefully individual seed quality doesn’t get too much in the way. I lightly watered the plain pots with water and the fish pots with fish solution.

After only four days the radishes, true to form, were making an appearance. At least one plant emerged in every pot.

Oddly enough, though, the water-treated seedlings look vastly healthier.

20150616_152734_HDR20150616_152740_HDR


Go ahead and click on the pictures to enlarge them so you can see the seedlings and my beautiful labeling. The plain seedlings look more developed and vividly green. Their leaves are splayed out completely. Also, only the completely untreated pot has two of its three seedlings already. The fish seedlings, on the other hand, look yellower and not fully opened yet. This could be chalked up to a few hours’ difference in growth at this stage, but I really did sow everything in one go. Eagle-eyed readers may notice that there are berries just everywhere. They’re mulberries, and they’re getting a post of their own soon.

I’ll be tracking the seedlings’ growth and updating every now and again. If this current trend continues, maybe I’ll have enough evidence to bring down Big Fish.

Wine Progress

Mango wine has been put on hold. Avid readers may remember that I was keeping twenty pounds of mangoes under my desk, waiting for them to soften. But it’s been a hot week, and my six gallon bucket had blueberries fermenting in it. So I, forward thinker that I am, moved the mangoes to the cellar, where they could keep nice and cool. 20150614_171256_HDR

And something ate them!

I don’t know if was a badger, or a rat, or a man living in the walls, but whoever it is is well nourished now. I’ll have to buy some more when they’re softer in the store and I have a fermenter ready for them. And watch my back when I’m in the cellar.

But it’s not all tragedy on the wine front.

I freed up that 6 gallon bucket of blueberry wine and moved it to a carboy. I also learned from my strawberry adventure that even with the pump, regular old siphoning is a lot easier. Although it does look like an IV drip…

20150614_191510_HDR

My mead also finally stopped its bubbling, and I moved it to a new carboy. It came up a little short, and I had to top it up with some water, which I hope wasn’t a mistake. That meant I only got to try a tiny bit that was left behind, but I was amazed at how… meady it tasted. Like something I might pay money for and not regret. Which is the goal, I suppose.

I learned my lesson from the sprouting strawberry wine and bought a pair of pantyhose to act as a filter bag for the grapefruit wine I started. I cut off one of the legs, jammed it full of grapefruit segments and zest, and then tied the end off.

20150614_153245_HDR

Ooh la la.

The other leg is full of dried elderberries, which I ordered online. Apparently they were grown in Norway! I’ve since found a Pick Your Own farm in Connecticut that has them. Maybe I’ll go there and get a feel for what they look like before I start foraging mysterious roadside berries.

Last but not least, I racked the rhubarb out of that horrible Mr. Beer keg which, to its credit, did not leak out of any new places. I was right in resigning myself to no healthy pink blush. I wasn’t anticipating this color, though, which unkind critics might call “dishwater” but I’m choosing to call “pearl.” I’m really curious to see if it settles over time into something transparent.20150615_172143_HDR

Even after filling the carboy so high, there was a lot left over. And wouldn’t you know, it’s palatable! Very tart and crisp. I could see it being a decent summer wine. Which is too bad, because it probably won’t be done until the fall.

20150615_17321120150615_172549

Fulfilling a Dream

I’m becoming a beekeeper!20150613_125532

Eventually.

I’m a lot closer than I used to be, anyway. The community garden I belong to keeps its own bee colony, and I’m apprenticing Kimberly, the garden member who actually knows what she’s doing. I’m the faceless one on the right. I promise it’s me.

The New England winter this year was famously awful. You may have heard about it. Or experienced it. A huge number of bee colonies died, and ours was one of them. So we ordered a new starter colony. Out of a little mesh crate about the size of an actual bread box, we released a few thousand bees into our hive. They’ve had a little over a month to get settled, and they’re doing great.

20150505_131550They’ve been filling up their first box nicely, so recently we put a second box, the blue one, on top. Yesterday we went in for the first time since then to see if the queen had moved up to the second box to continue laying. Kimberly prised the frames out one at a time and I noted our findings on my little clipboard.

My Findings:

The bees are loving it in the second box. They’re active in at least half the frames, collecting nectar and storing honey. And the queen, most importantly, is out and about and laying eggs. Queens are pretty easily distinguishable from the rest of the colony, mainly because they’re so much bigger. You can pay a little extra, though,20150613_130035 to get your queen shipped with a splotch of blue paint on her back. It’s easier for us, and it’s easier for blogging. There she is, right in the top middle.

We took a peek into the bottom box, but didn’t open it all up because we’d already been messing with the bees for a while and didn’t want to keep disturbing them. There’s still a whole lot of activity down there, so next time we’ll go in and see what those guys are up to. Once most of the frames have been filled up, we’ll add a third box on top, as well as a queen excluder, which is a fine grating the worker bees can fit through but the queen can’t. That means the third box can be devoted to honey, without a bunch of eggs getting in the way. But that’ll be later in the summer. For now we’re just observing, and I’m taking notes on my clipboard.

-Bees watch out

And expressing myself artistically.